
How Do You Adjust the Springs on a Garage Door? A Step-by-Step Guide for Safe DIY Repairs
If your garage door has been acting up lately – creaking, jerking, or refusing to stay open halfway – there is a good chance the springs need attention. Garage door springs play a critical role in how your door moves, and knowing when and how to adjust them can save you time and frustration.
That said, this is not the kind of task you rush into. Adjusting your garage door springs requires the right tools, a clear understanding of what you are dealing with, and serious respect for the risks involved. This guide will help you adjust the springs safely and confidently, and will also show you when it’s smarter to call a pro.
Why Proper Spring Adjustment Matters
Garage door springs are under high tension at all times. They carry the weight of the door and help the opener do its job without burning out. When spring tension is off, the door can slam shut, drift open, or create uneven stress on the cable and roller hardware.
Regular spring adjustment is not just about convenience. It is about safety, performance, and helping you extend the lifespan of your entire door system. Improperly adjusted springs can wear out faster, damage the opener, or create hazards for anyone nearby.
Understanding the Types of Garage Door Springs
Before you learn how to adjust garage door springs, you need to know which type of spring your door uses. There are two main types of garage door springs, and each one behaves differently.
Torsion Springs
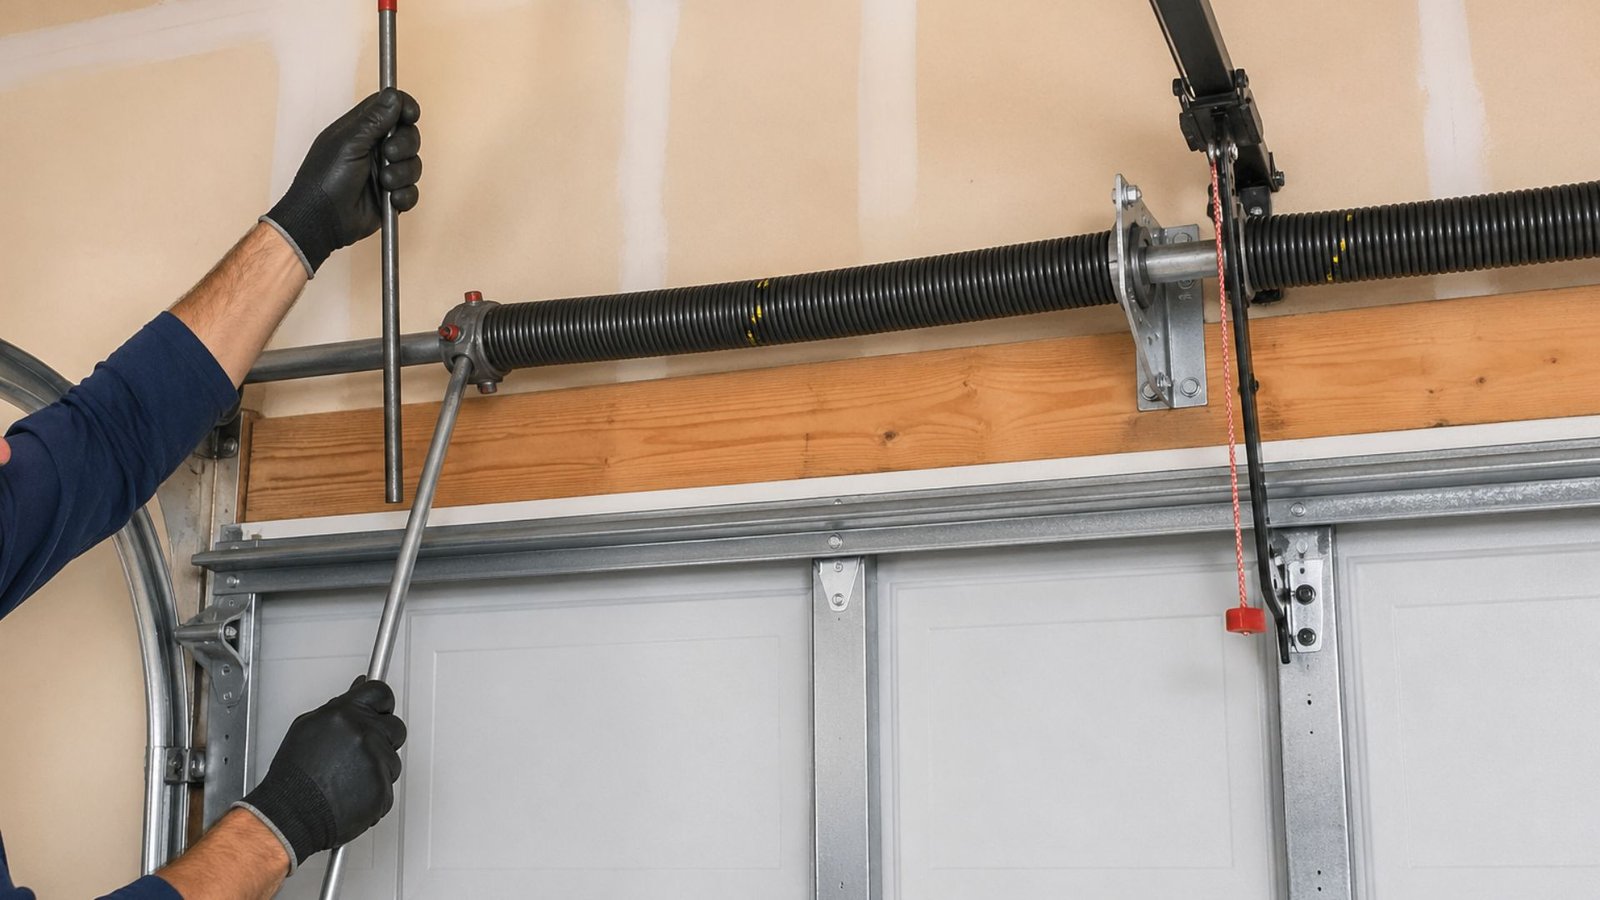
Torsion springs are located above the garage door opening, mounted on a steel shaft that runs horizontally. They work by twisting and storing energy as the door closes, then releasing it to help lift the door when it opens. Most modern residential garage doors use this type of spring.
Torsion spring tension is adjusted by winding or unwinding the spring using a winding bar inserted into the winding cone at each end of the spring. This is where the process gets technical – and potentially dangerous.
Extension Springs
Extension springs are located on either side of the door, running along the horizontal tracks. They stretch and contract as the door opens and closes. If your garage has older hardware or a lighter door, you may have this setup instead.
Extension springs are slightly more accessible than torsion springs, but they still carry significant tension and demand the same level of caution.
Tools and Safety: What You Need Before You Start
Never attempt a spring adjustment without gathering the right tools first. Going in underprepared is how accidents happen.
Here is what you will need:
- Winding bars – These are specifically designed for torsion spring work. Never use screwdrivers or other makeshift tools as substitutes. They can slip and cause injury.
- Proper tools – A wrench, locking pliers, and a sturdy ladder are all essential.
- Safety gear – Wear safety glasses and gloves throughout the entire adjustment process.
- A helper – Having someone nearby to hold the ladder or assist is always a smart precaution.
It is also worth noting that door springs are under high tension, and working with them without the right tools significantly increases the risk of injury. If you lack the proper tools or feel uncertain at any point, contact a professional before proceeding.
Safety Precautions to Follow Throughout the Process
Before touching anything, go through these safety precautions carefully. Skipping even one of them can result in serious injury.
- Disconnect the garage door opener before doing any manual work. This prevents the door from moving unexpectedly while your hands are near the spring hardware.
- Never work on springs while the door is open and fully raised. Work with the door closed or at a controlled position.
- Do not use screwdrivers in the winding cone holes. Always use winding bars that are the correct size for your spring.
- Keep your body to the side of the door and away from the direct path of the spring if it were to release.
- Inspect the cable and drum hardware before starting. If anything looks frayed, cracked, or damaged, stop and call a pro.
These steps are not suggestions. They are non-negotiable if you want to safely adjust garage door springs at home.
How to Adjust Torsion Springs: Step-by-Step
Here is how to adjust the springs on a torsion system. This process covers the most common residential setup. Homeowners can safely adjust torsion springs with patience and the right approach, but the margin for error is small.
Step 1: Disconnect the Garage Door Opener
Unplug your garage door opener and pull the manual release cord. This ensures the door operates manually and does not get triggered mid-adjustment. You want full control over the door at all times.
Step 2: Test the Balance of the Door
Lift the door manually to about halfway up, roughly three to four feet off the ground. If the door stays in place, the springs are balanced. If it falls or rises on its own, the springs may need adjustment. This simple test tells you how much tension adjustment is needed.
Step 3: Locate the Winding Cone
The winding cone is at the end of the torsion spring, near the wall or drum. You will see small holes on it where you insert the winding bar. Loosen the set screws on the winding cone using a wrench before making any adjustments.
Step 4: Increase or Decrease Tension Using the Winding Bar
Insert a winding bar firmly into one of the holes in the winding cone. Use winding bars in a controlled, deliberate motion. To increase tension, wind the spring upward. To decrease tension, wind it downward.
A general rule: each quarter turn adds or reduces noticeable tension. Most torsion spring adjustments require one to three quarter-turns at a time. After each turn, recheck how the door operates before continuing.
Step 5: Tighten the Set Screws
Once you have the right tension, tighten the set screws securely using your wrench. Do not overtighten, but make sure they are snug enough to prevent the winding cone from shifting. Loose set screws on the winding cone can allow the spring to shift and cause problems later.
Step 6: Lubricate and Test
Apply a garage door lubricant to the spring, cable, and roller to reduce friction and prevent premature wear. Then reconnect the garage door opener and test the door. Watch how the door opens and closes – it should move smoothly and safely without jerking or drifting.
When to Call a Professional Instead
Even experienced DIYers sometimes encounter situations where professional help is the right call. Springs can lose tension unexpectedly, two springs may need to be replaced at once, or the cable and drum might have damage that complicates the job.
If you notice the door’s movement is affected by something beyond spring tension – like a broken cable, a bent track, or a damaged opener – those are signs that broader garage door repair is needed. In those cases, professional garage door technicians have the experience and equipment to handle it without putting anyone at risk.
At Level Up Garage Door Pros, the team offers professional garage door repair services that cover everything from spring work to full system diagnostics. If something feels off or looks wrong, it is worth a call before the problem gets worse.
For homeowners thinking about upgrading their setup entirely, expert garage door installation ensures your new door is built for durability and properly balanced from day one.
Frequently Asked Questions
How do I know if my garage door springs need adjustment?
The clearest signs are a door that slams shut, drifts open, hangs unevenly, or feels unusually heavy when lifted manually. You may also notice the opener straining more than usual.
Can I adjust garage door springs safely without experience?
With the right tools and this step-by-step guide, homeowners can safely adjust torsion springs on their own. However, if you are unsure about any part of the process or if your door has two springs that are both worn, calling a professional is the safer choice.
How often does spring adjustment need to happen?
It varies by how often the door is used. A typical residential garage door cycles up and down thousands of times per year, and springs can lose tension over time. Having a professional inspection once a year can catch problems early.
Is adjusting garage door springs essential for door longevity?
Absolutely. Maintaining proper spring tension keeps stress off the opener, cable, and other hardware. Adjusting your garage door springs is essential for keeping the whole system running well.
Conclusion
Adjusting garage door springs is a manageable DIY project when you approach it carefully and with the right tools. The key is understanding your spring type, following every safety precaution, and knowing when the job is beyond a DIY fix. If you are in League City and want expert eyes on your setup, schedule a garage door consultation with the team at Level Up Garage Door Pros. Keep your garage door running smoothly and safely – because a well-maintained door is one less thing to worry about.